Patriotic Oreo balls are the kind of no-bake dessert that disappears fast because they hit that perfect middle ground: rich, creamy centers, a crisp white chocolate shell, and just enough red, white, and blue decoration to look festive without turning into a project. They slice through cleanly with a fork, but they still taste like the classic cookies-and-cream bite everyone reaches for first on a dessert tray.
The trick is getting the Oreo crumbs fine enough that the filling turns into a smooth dough instead of a lumpy paste. Softened cream cheese binds everything without making the centers wet, and the brief freeze before dipping keeps the balls firm so the coating goes on neatly. White chocolate melting wafers are the easiest route here because they set with a clean finish and don’t fight you the way regular chocolate can when it’s being used for dipping and drizzling.
Below, I’ve included the small details that keep the coating from cracking, plus the one step that makes the drizzles stay sharp instead of sinking into the shell. If you’ve ever had Oreo balls turn messy at the dipping stage, this version will save you a lot of frustration.
The centers were smooth, not grainy, and the white chocolate set up fast enough that the red and blue drizzle stayed crisp. I made them the night before a cookout and they held their shape perfectly.
Save these patriotic Oreo balls for the red, white, and blue dessert tray when you want something no-bake, polished, and easy to make ahead.
The Filling Has to Be Dry Enough to Roll Cleanly
The biggest mistake with Oreo truffles is starting with a filling that feels loose. If the cream cheese is too warm or the crumbs are too coarse, the mixture turns sticky and the balls slump while you’re rolling them. You want a thick dough that holds a crease when you press it, almost like soft cookie dough.
Fine crumbs matter more here than people think. Large cookie pieces don’t fully disappear into the cream cheese, and they make the texture uneven once the centers are chilled. A food processor gives the most consistent result, but if you’re crushing by hand, keep going until the crumbs look like dark sand with no visible cookie chunks.
What Each Ingredient Is Actually Doing in This Recipe

- Primary ingredient (the star) — Quality matters most. Choose the best you can find.
- Cooking medium (oil, butter, or broth) — This carries flavors and prevents dryness.
- Seasonings (salt, pepper, spices, herbs) — Layer flavors so nothing overpowers. Build depth gradually.
- Aromatics (garlic, onion, herbs) — Cook with fat to bloom flavors. Become the foundation.
- Supporting ingredients — Complement the main ingredient without overpowering it.
- Sauce or liquid (if applicable) — Brings flavors together. Balance richness with acid.
- Acid (lemon, vinegar, wine, or other) — Brightens and prevents flat-tasting results.
- Final finish (garnish, glaze, or sauce) — Prevents one-dimensional taste and adds visual appeal.
What the Cream Cheese and White Chocolate Are Each Doing
- Oreos — These are the base, the structure, and the flavor. You need the whole cookie, filling and all, because the filling helps bind the crumbs and gives the truffles their classic cookies-and-cream taste.
- Cream cheese — This is what turns dry crumbs into a rollable dough. Use full-fat cream cheese for the best texture; reduced-fat versions can make the centers softer and less stable.
- White chocolate melting wafers — Melting wafers are made for coating and set up smoothly, which is exactly what you want when you’re dipping small balls. Regular white chocolate can work, but it’s fussier and more likely to thicken before you finish dipping.
- Red and blue candy melts — These are for the decoration only, so they don’t need to be fancy. They just need to melt smoothly enough to drizzle in thin lines over the set coating.
- Star sprinkles — Add these immediately after drizzling so they stick before the candy sets. If you wait, they’ll bounce right off the shell instead of clinging to it.
Chilling, Dipping, and Decorating Without a Mess
Building the Oreo Dough
Pulse the cookies until the crumbs are very fine, then mix in the softened cream cheese until the mixture turns uniform and dark all the way through. If you still see pale streaks of cream cheese, keep mixing; those pockets lead to uneven truffles that don’t slice or bite cleanly. The dough should feel dense and moldable, not wet or greasy.
Rolling and Firming the Centers
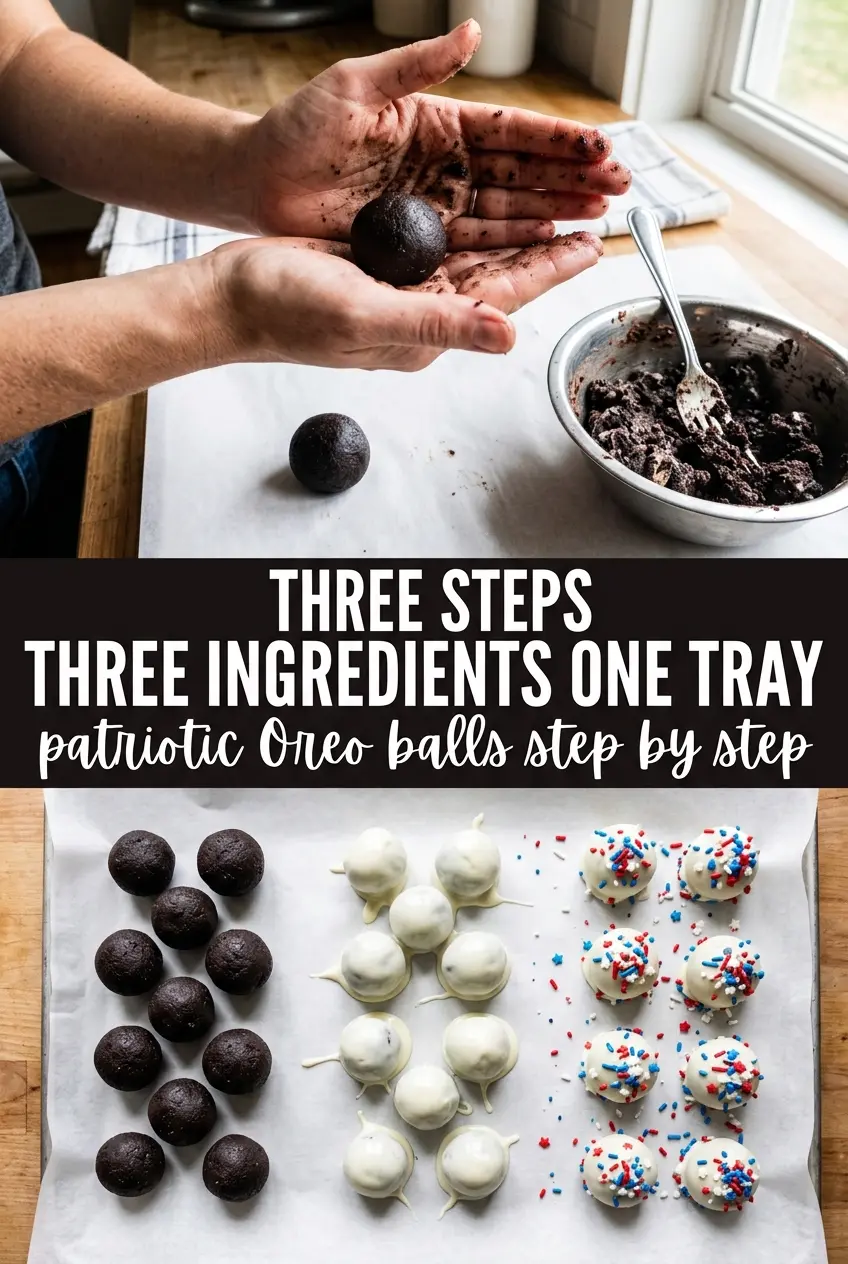
Shape the mixture into 1-inch balls and put them on a parchment-lined sheet with a little space between each one. Freezing them for 30 minutes is what keeps them from falling apart in the coating. If they’re too soft, they’ll drag crumbs into the melted chocolate and turn the whole bowl muddy.
The White Chocolate Coating
Melt the wafers until smooth and glossy, then dip each chilled ball with a fork and tap off the excess. Work with a few balls at a time and keep the rest cold, because once they warm up, they lose their shape and become harder to coat neatly. If the coating starts thickening, warm it briefly before continuing instead of forcing it onto the truffles.
Red, White, and Blue Finishing Touches
Drizzle the melted candy in thin lines over the set or nearly set coating, then finish with star sprinkles right away. Thin drizzles look cleaner and keep the decoration from feeling heavy. If your drizzle melts into the shell, the white coating was too soft; give the truffles a few minutes in the refrigerator before decorating.
How to Adapt Patriotic Oreo Balls for Different Crowds and Cravings
Dairy-Free Oreo Balls
Use a dairy-free cream cheese alternative and check that your sandwich cookies are dairy-free, since some versions contain whey. The texture will still be creamy, but the filling may soften a little faster at room temperature, so keep the finished truffles chilled until serving.
Gluten-Free Version
Swap in certified gluten-free chocolate sandwich cookies and keep everything else the same. The dough rolls the same way, but gluten-free crumbs can feel slightly drier, so let the mixture rest for a minute after mixing before deciding whether it needs another small spoonful of cream cheese.
Make Them a Little Smaller for Party Platters
Roll the dough into 3/4-inch balls instead of 1-inch balls if you want more pieces for a larger group. Smaller truffles chill faster and coat more quickly, but they’re also easier to over-handle, so keep the motion gentle when dipping and decorating.
Storage and Reheating
- Refrigerator: Store in an airtight container for up to 5 days. The centers stay creamy, but the coating may pick up condensation if they sit out too long after chilling.
- Freezer: Freeze on a tray, then transfer to a container for up to 2 months. Thaw in the refrigerator so the coating doesn’t sweat and dull the drizzle.
- Reheating: Not needed. Serve chilled or slightly cool for the best texture; warming them softens the centers and can make the white chocolate shell lose its clean snap.
Answers to the Questions Worth Asking
Patriotic Oreo Balls
Ingredients
Equipment
Method
- Crush Oreo cookies in a food processor until they become fine crumbs with no large pieces remaining.
- Mix Oreo crumbs with softened cream cheese until fully combined into a thick uniform dough.
- Roll dough into 1-inch balls and place on a parchment-lined sheet pan, then freeze for 30 minutes.
- Melt white chocolate melting wafers according to package instructions until smooth.
- Dip each chilled Oreo ball into white chocolate using a fork, let excess drip off, and return to the parchment sheet.
- Melt red and blue candy melts separately until fluid, then drizzle over the coated balls in thin lines.
- Immediately top each ball with red, white, and blue star sprinkles so the sprinkles stick before the chocolate sets.
- Refrigerate for 30 minutes until fully set before serving, then arrange in patriotic rows.