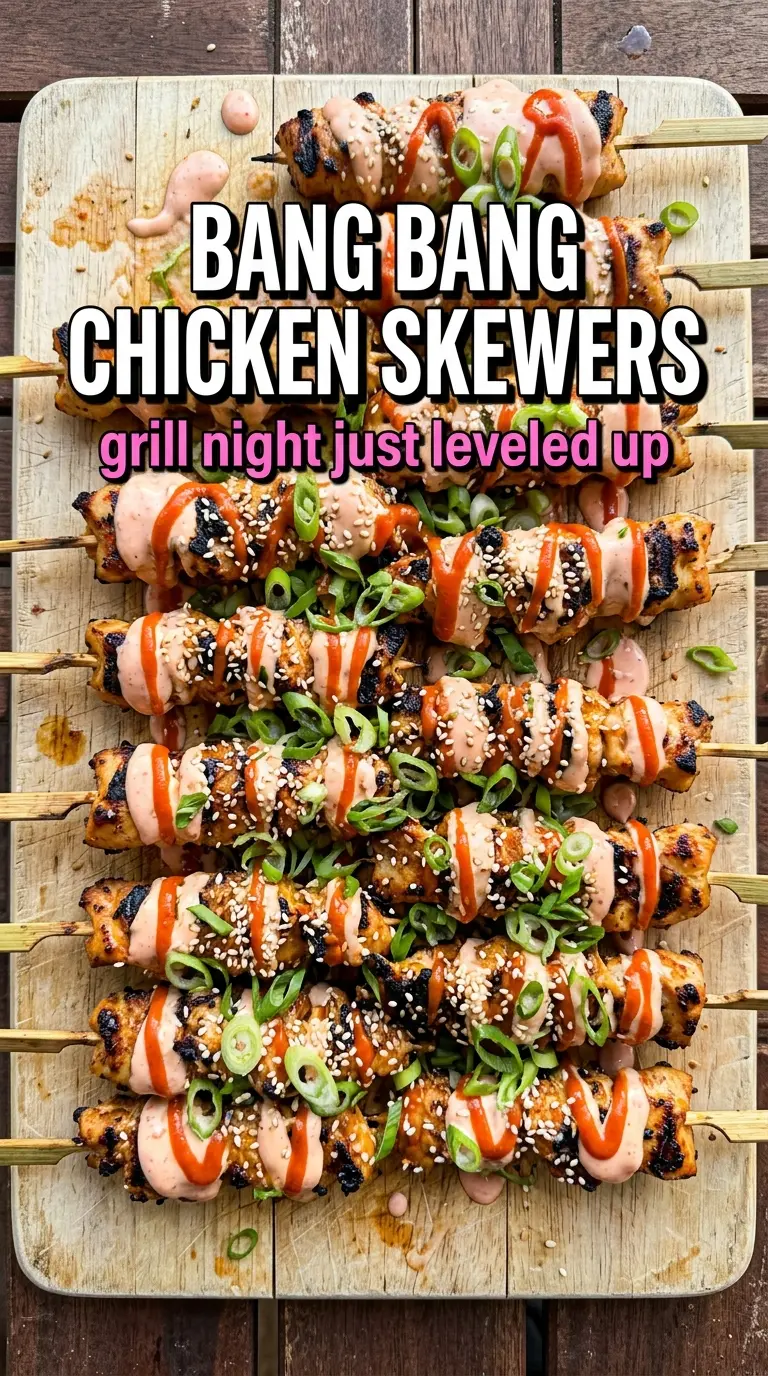
Juicy chicken with a sticky, creamy glaze and a little char at the edges is the kind of dinner that disappears fast. These bang bang chicken skewers hit that sweet-spicy balance in a way that keeps you reaching for one more piece, and the grill gives them the smoky finish that makes the sauce taste even better.
What makes this version work is the timing. The chicken gets a short marinade for seasoning and surface moisture, then the sauce goes on near the end so the mayo base stays silky instead of splitting over high heat. The result is chicken that stays tender inside while the outside picks up those dark, caramelized spots everyone wants from a skewer.
Below, I’ve included the little details that matter most: how to keep the chicken from drying out, when to brush on the sauce, and a few swaps that still keep the dish balanced and glossy.
The sauce clung to the chicken without burning, and the little bit of lime at the end kept it from tasting heavy. My kids ate theirs straight off the skewers before I even got them to the table.
Save these spicy-sweet Bang Bang Chicken Skewers for the next grill night when you want something sticky, charred, and fast enough for a weeknight.
The Sauce Goes on Last for a Reason
Bang bang sauce has enough sugar and mayonnaise to scorch before the chicken finishes cooking if you brush it on too early. That’s the mistake that turns a glossy coating into a burnt, bitter layer stuck to the grates. The better move is to grill the chicken until it’s nearly done, then brush on the sauce for the last couple of minutes so it warms, thickens slightly, and picks up the grill marks without breaking.
The other thing that matters here is size. Cut the chicken into even 1.5-inch pieces so every skewer cooks at the same pace. If some pieces are smaller, they dry out before the larger ones are done. Uniform pieces give you juicy chicken and a better chance of getting a light char on the outside without overcooking the center.
- Chicken breast — Breast meat works because the sauce adds richness back in. Cut it evenly and don’t marinate it for hours; the salt and seasoning only need 30 minutes to do their job.
- Mayonnaise — This is the base that makes the sauce cling. Use a full-fat mayo for the smoothest texture; lighter versions can turn thin and watery once they hit the heat.
- Sweet chili sauce — This brings sweetness, garlic, and a little body. There isn’t a perfect substitute, but apricot preserves thinned with a splash of vinegar can get you close in a pinch.
- Sriracha — It gives the sauce its heat and a little tang. If you want a milder version, cut it back and add a pinch of cayenne only if you need more bite after tasting.
- Lime juice — A small amount keeps the sauce from tasting flat. Fresh lime is worth using here because bottled juice can taste dull against the creamy sauce.
What Each Ingredient Is Actually Doing in This Chicken Dish
- Chicken (pat dry for browning) — Room temperature cooks more evenly. Even thickness ensures uniform cooking.
- Oil or butter (the browning medium) — High-heat oil essential. Creates pan flavor through browning.
- Seasonings (salt, pepper, spices) — Apply generously. Chicken carries the entire flavor profile.
- Aromatics (garlic, ginger, or herbs) — Cook with fat to bloom flavors. Become the foundation.
- Sauce or braising liquid (if using) — This keeps chicken moist. Balance richness with acid.
- Vegetables (if using) — Layer by cooking time. Hard vegetables first, soft vegetables last.
- Acid (vinegar, wine, lime, or pineapple) — This brightens and prevents one-dimensional flavor.
- Proper doneness (165°F internal temperature) — Use thermometer for accuracy. Overcooked is dry and flavorless.
How to Keep the Chicken Juicy While It Cooks
Seasoning the Chicken First
Toss the chicken with olive oil, salt, black pepper, and garlic powder before it goes on the skewers. The oil helps the seasonings coat the meat evenly and gives the grill a little insurance against sticking. If the chicken looks wet and slippery instead of lightly coated, it won’t brown as well, so stop as soon as the pieces are evenly slicked.
Threading the Skewers
Pack the pieces close together, but not so tight that heat can’t move around them. Leave a little space at the ends so the skewers are easier to turn and handle on the grill. If the pieces are wildly different in size, pull them off the skewer and even them out now; that’s the point where uneven cooking gets corrected.
Grilling to the Right Point
Cook the skewers over medium-high heat for about 5 to 6 minutes per side. You’re looking for browned edges, opaque centers, and juices that run clear when you cut into the thickest piece. If the outside is darkening too fast before the inside is done, move the skewers to a cooler part of the grill and finish them there instead of turning the heat up.
Finishing With the Sauce
Brush on the bang bang sauce during the last 2 minutes so it warms through and picks up a little char without burning. Turn the skewers once after saucing so both sides get coated. As soon as they’re off the grill, hit them with sesame seeds and green onions while the sauce is still tacky so the garnish actually sticks.
How to Adapt These Skewers Without Losing the Point
Make It Dairy-Free Without Changing the Texture
This recipe is already dairy-free as written, so you don’t need to adjust the sauce to avoid cream or cheese. Stick with regular mayonnaise, since that’s what gives the coating its body and sheen. If you swap in a vegan mayo, expect a slightly lighter sauce with a softer finish.
Use Chicken Thighs for a More Forgiving Bite
Boneless skinless thighs work well if you want juicier skewers and a little more room for error on the grill. Cut them into the same size pieces and expect a slightly richer result with less risk of drying out. They may take a minute or two longer than breast meat, so cook to temperature rather than the clock alone.
Turn It Into a Gluten-Free Main
The chicken itself is naturally gluten-free, but sweet chili sauce can vary by brand, so check the label before you start. Use a certified gluten-free version if needed, and the rest of the recipe stays exactly the same. You’ll still get the same sticky, sweet heat without changing the cooking method.
Make It on a Grill Pan or Broiler
If you don’t have an outdoor grill, use a well-heated grill pan or broil the skewers close to the heat source. You still want the same visual cue: browned edges before the sauce goes on, then a short finish with the glaze. The flavor stays close, though you’ll lose a little of that smoky grill note.
Storage and Reheating
- Refrigerator: Store leftovers in an airtight container for up to 3 days. The sauce will thicken in the fridge, but the chicken still holds up well.
- Freezer: Freeze the cooked chicken without extra garnish for up to 2 months. The sauce can separate a little after thawing, so freeze only if you’re okay with a slightly looser finish.
- Reheating: Reheat gently in a covered skillet over low heat or in a 300°F oven until warmed through. High heat dries out the chicken fast and can make the sauce look broken, so slow and steady works best.
Questions I Get Asked About This Recipe

Bang Bang Chicken Skewers
Ingredients
Equipment
Method
- In a bowl, mix olive oil with salt, black pepper, and garlic powder, then toss with the chicken cubes until evenly coated.
- Marinate the chicken for 30 minutes.
- Thread the marinated chicken onto the soaked wooden skewers.
- Whisk together mayonnaise, sweet chili sauce, sriracha, honey, and lime juice to make the bang bang sauce.
- Grill the skewers over medium-high heat for 5–6 minutes per side until cooked through and lightly charred.
- Brush the skewers generously with bang bang sauce during the final 2 minutes of grilling.
- Serve immediately with extra sauce for dipping, topping with sesame seeds and green onions and serving alongside lime wedges.