Patriotic mini ice cream sandwiches are the kind of frozen treat that disappears fast because they hit every note at once: soft cookie, cold vanilla ice cream, and a bright sprinkle edge that makes each bite feel festive. The mini size matters here. They freeze faster, stay easier to handle, and give you a better cookie-to-ice-cream ratio than the oversized versions that turn messy before you finish one.
The cookie base starts with cake mix, which keeps the texture tender and slightly chewy instead of dry and crumbly. That matters because a brittle cookie cracks when you press in the ice cream. A quick chill after baking helps the cookies firm up enough to sandwich cleanly, and using ice cream that’s only slightly softened keeps it scoopable without turning soupy the moment it hits the cookies.
Below, I’ve included the exact cues I look for when the cookies are baked just right, plus a few ways to swap the cookie base or prep these ahead for a crowd without losing that clean, colorful finish.
The cookies stayed soft enough to press without cracking, and the ice cream edge rolled in sprinkles looked just like the pictures. I froze them overnight and they held together perfectly for our Fourth of July party.
Save these patriotic mini ice cream sandwiches for a make-ahead frozen dessert with soft red velvet cookies and sprinkle-coated edges.
The Part That Keeps Mini Ice Cream Sandwiches from Cracking
The biggest mistake with homemade ice cream sandwiches is rushing the assembly before the cookies and ice cream are at the right temperature. Warm cookies melt the ice cream into the sides, and brittle cookies split when you press them together. These minis work because the cookies are baked just until set, then cooled completely and briefly frozen so they firm up without becoming hard as rocks.
That short freeze on the cookies is worth the extra step. It gives you a cleaner edge when you sandwich the ice cream, and it helps the finished desserts hold their shape long enough to roll in sprinkles without smearing them across the sides. If your cookies are overbaked, they’ll taste fine but they’ll snap instead of bend, which makes assembly frustrating.
- Red velvet cake mix — This brings color and a soft, tender crumb without the work of measuring dry ingredients. Chocolate cake mix works the same way if you want a deeper cocoa note or don’t care about the red color.
- Eggs and oil — Together, they create the dough structure and keep the cookies chewy. Don’t swap in melted butter here unless you’re ready for a slightly firmer cookie that spreads differently.
- Vanilla ice cream — A plain, good-quality vanilla lets the cookie and sprinkle edge stay in charge. The ice cream should be softened just enough to scoop; if it’s melted, it squeezes out and makes the sandwiches slippery.
- Red and blue sprinkles — Jimmies or narrow rod-style sprinkles cling better than sanding sugar. The goal is a colorful border that stays put in the freezer, not a sugary crust that falls off onto the plate.
What Each Ingredient Is Actually Doing in This Ice Cream

- Base ingredient (cream, milk, or custard) — This provides the foundation and richness. Quality matters.
- Sweetener (sugar, honey, or condensed milk) — This sweetens and prevents ice crystals. The ratio is critical.
- Flavor element (vanilla, fruit, chocolate, or other) — This defines the ice cream personality. Use quality ingredients.
- Egg yolks (if making custard base) — These create richness and silky texture. Optional but elevates ice cream.
- Churning (if using ice cream maker) — This incorporates air and prevents ice crystals. Critical for smooth texture.
- Freezing temperature and time — Proper freezing prevents rock-hard texture. Store at 0°F or below.
- Mix-ins (chocolate, cookies, fruit, or swirls) — These add texture and prevent one-dimensional flavor. Add near end of churning.
- Serving temperature (slightly soft, not rock hard) — This provides creamy mouthfeel. Remove from freezer 5 minutes before serving.
Building the Sandwiches Before the Ice Cream Melts
Mixing the Dough
Stir the cake mix, eggs, and oil until a thick dough forms and no dry pockets remain. It will look more like a soft cookie dough than a pourable batter, and that’s exactly what you want. If it feels sticky, let it sit for a minute or two instead of adding extra flour, which can make the cookies dry and tough.
Baking to the Right Set
Scoop tablespoon-sized portions and flatten them to small circles before baking so they cook evenly and stay sandwich-sized. Pull them when the tops look set and the edges are just beginning to firm up; they should not look dry all the way through. If you wait for deep browning, they’ll bake too far and lose the soft bite that makes these sandwiches work.
Chilling, Filling, and Rolling
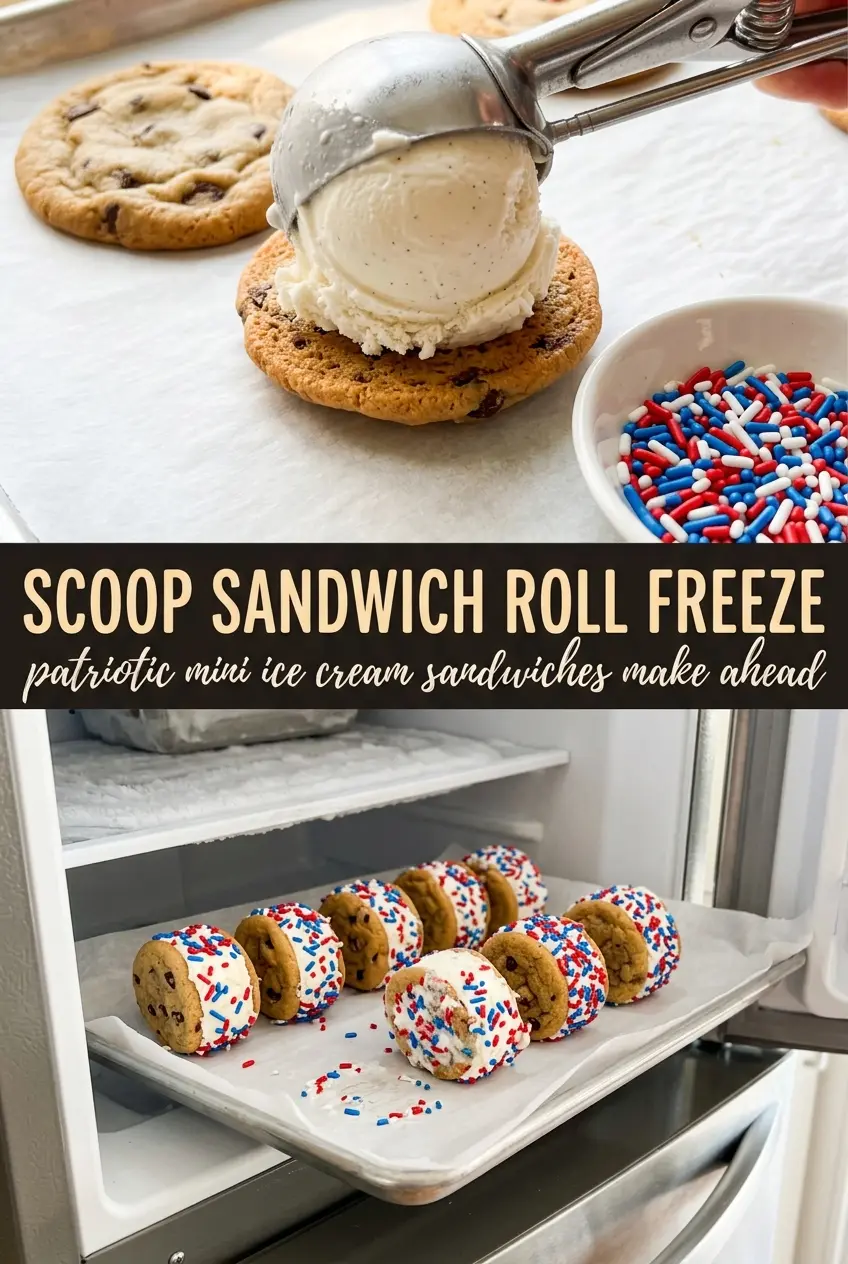
Cool the cookies completely on a rack, then freeze them for 30 minutes so they’re sturdy enough to handle. Work with the ice cream in small batches and keep the remaining sandwiches in the freezer while you assemble, because even a few extra minutes on the counter makes the ice cream start to slump. After pressing the top cookie on, roll the exposed edge in sprinkles right away before the ice cream firms up.
The Final Freeze
Wrap each sandwich tightly in plastic wrap and freeze until solid. This last rest is what turns them from soft assembly pieces into a neat dessert you can actually serve without a race against the drip. If they’ve been in the freezer overnight, let them sit at room temperature for a minute or two before serving so the cookies soften just enough to bite cleanly.
How to Adjust These for Different Cookies, Colors, and Diets
Chocolate Cake Mix Version
Use chocolate cake mix instead of red velvet for a darker, more classic ice cream sandwich look. The flavor gets a little richer and less festive in color, but the texture stays the same, which makes it the easiest swap if you want the same build with a different base.
Dairy-Free Ice Cream Sandwiches
Swap in your favorite dairy-free vanilla frozen dessert and keep the assembly process the same. Choose one that softens smoothly, not one that turns icy, because a gritty frozen dessert makes the center feel hard instead of creamy once it refreezes.
Gluten-Free Shortcut
Use a gluten-free red velvet or chocolate cake mix and bake the cookies just until set, because many GF mixes dry out faster than standard ones. The rest of the recipe stays the same, but the cookies may need an extra minute to cool before freezing so they don’t break when you press them together.
Make Them Bigger for a Crowd
Scoop slightly larger portions if you want standard ice cream sandwich size, then add a minute or two to the bake time and chill time. The flavor stays the same, but the sandwiches are easier to serve on a platter and less likely to vanish in one bite at a party.
Storage and Reheating
- Refrigerator: Don’t store these in the fridge. The cookies turn soggy and the ice cream softens too fast.
- Freezer: Wrap each sandwich individually in plastic wrap and freeze for up to 2 weeks for the best texture. Longer storage is possible, but the cookies start to lose that soft, fresh-baked bite.
- Reheating: No reheating needed. Let them sit at room temperature for 2 to 3 minutes before serving so the cookie can soften slightly without the ice cream dripping.
Questions I Get Asked About This Recipe
Patriotic Mini Ice Cream Sandwiches
Ingredients
Equipment
Method
- Preheat the oven to 350°F and line baking sheets with parchment paper.
- Mix the cake mix, eggs, and vegetable oil together until a thick dough forms.
- Scoop tablespoon-sized balls onto the prepared baking sheets, flatten to about 1/4-inch thick circles, and bake for 8–10 minutes until set—do not overbake.
- Let the cookies cool completely on a wire rack, then freeze for 30 minutes.
- Working quickly, place a scoop of slightly softened vanilla ice cream on the flat side of one cookie and press another cookie on top to sandwich.
- Roll the exposed ice cream edge in red and blue sprinkles, wrap each sandwich in plastic wrap, and freeze for at least 2 hours until solid before serving.