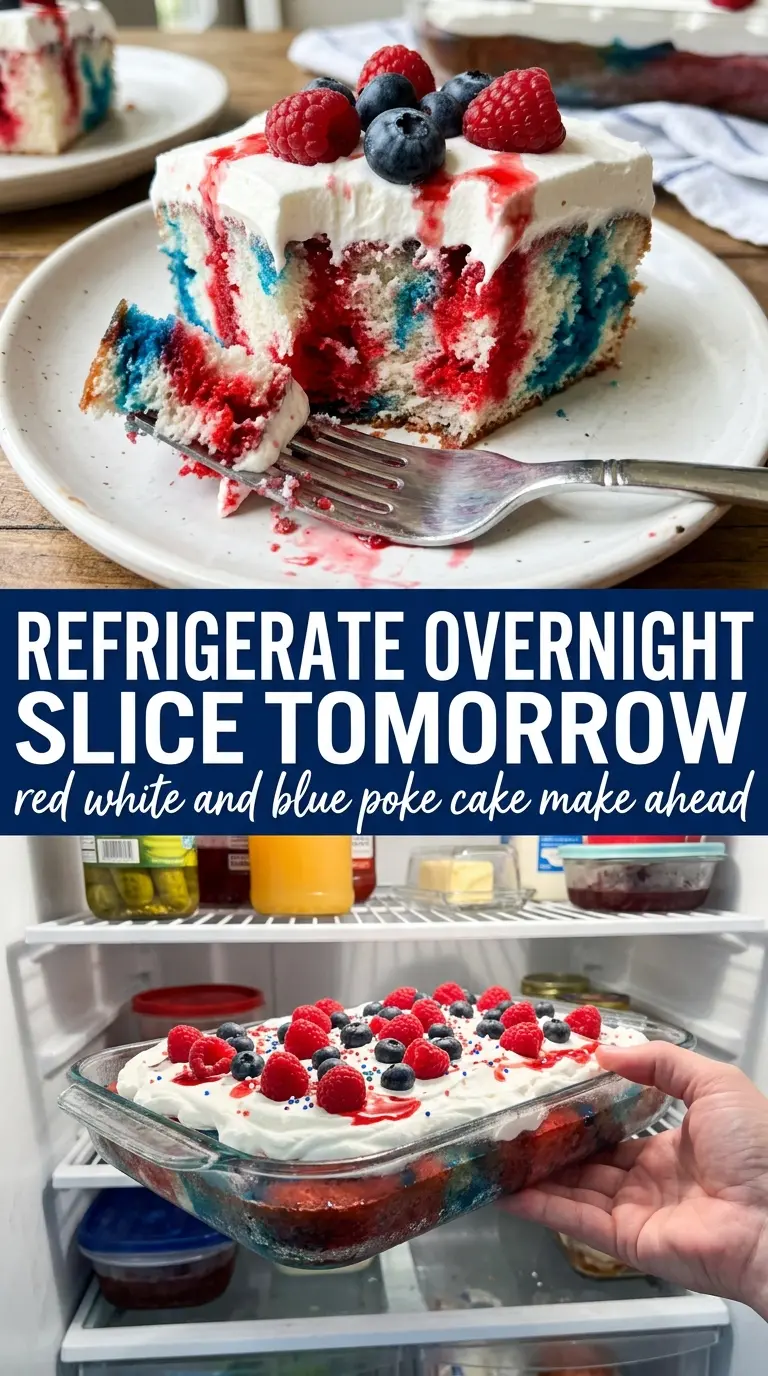
Red, white and blue poke cake earns its place on the table because every slice comes out striped, cold, and soft with that unmistakable Jell-O soak running all the way through the crumb. The cake stays light instead of heavy, the color stays bright instead of muddy, and the whipped topping gives it the kind of cool finish that makes people reach for a second piece before they finish the first.
The trick is in the timing and the pour. A warm cake absorbs the gelatin mixture better than a fully cooled one, but it still needs enough structure to hold the holes without collapsing. I also like pouring the strawberry and berry blue Jell-O separately over each half of the cake so the colors stay distinct and the finished pan looks as good as it tastes. That little bit of patience pays off every time.
Below, I’m walking through the part that matters most: how to get clean, vivid stripes without ending up with a soggy middle or a pale top. There’s also a note on garnishing so the cake looks festive right up until the last slice disappears.
The Jell-O soaked in evenly and the cake slices held their shape. I loved that the red and blue stayed separate instead of bleeding together, and the whipped topping made it taste light instead of too sweet.
Like this red, white and blue poke cake? Save it to Pinterest for the next celebration that needs bright Jell-O stripes and an easy chilled dessert.
The Part That Stops the Colors From Turning Muddy
The biggest mistake with poke cake is pouring too much liquid too fast. The cake can only take in so much at once, and if you flood the top, the Jell-O pools instead of threading through the holes. That’s how you end up with a wet top layer and a bland bottom instead of those clean red and blue stripes all the way down.
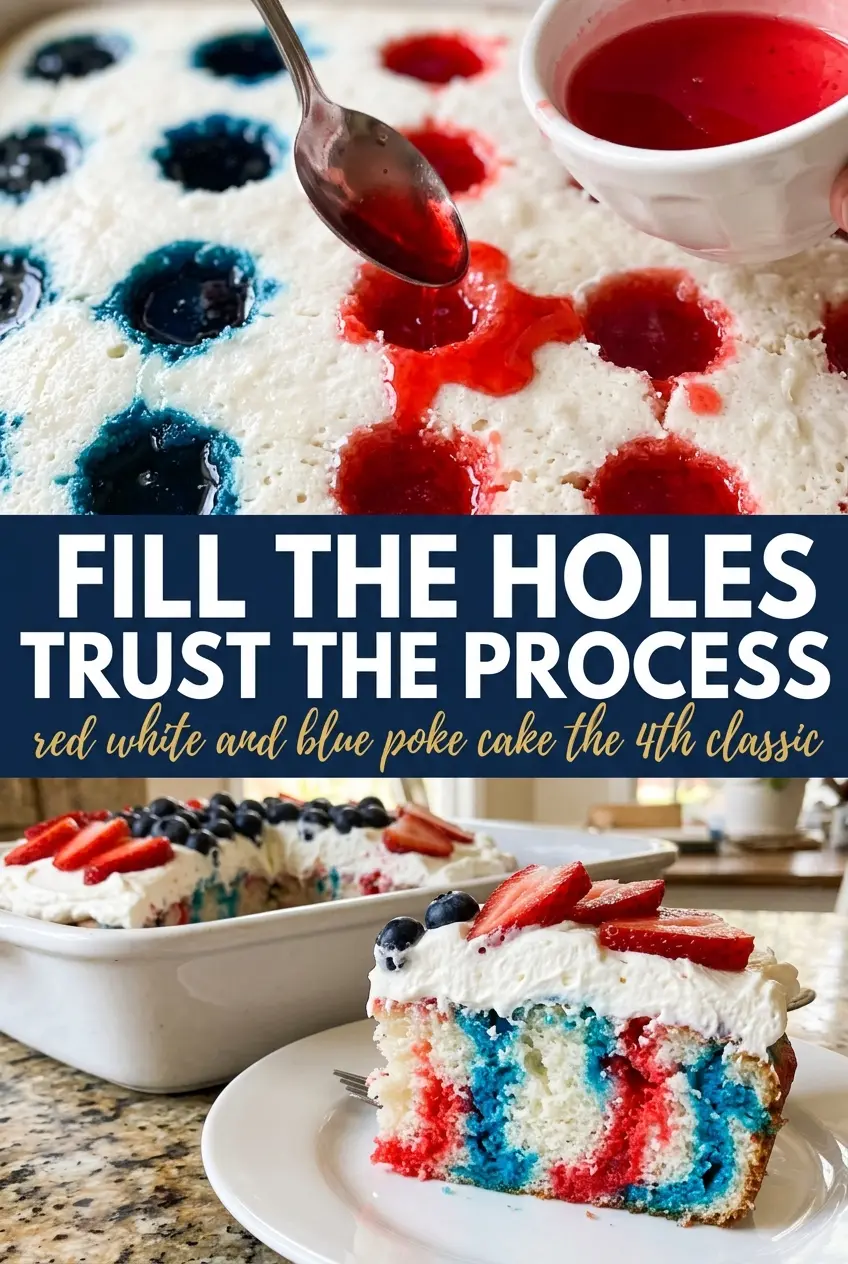
Use the handle of a wooden spoon and poke holes about an inch apart so the gelatin has a clear path through the cake. Let the cake cool for about 15 minutes after baking, not all the way, because a slightly warm crumb absorbs better. Then pour each color slowly over its own half of the pan and give it a minute to sink before adding more.
- White cake mix — This gives you the brightest backdrop for the red and blue stripes. A homemade white cake works too, but the boxed mix is sturdy, tender, and built to handle the Jell-O soak without crumbling.
- Strawberry and berry blue Jell-O — These are doing the color work and most of the flavor work. Other gelatin flavors will work, but they’ll change the look and can muddy the patriotic contrast.
- Cool Whip — Whipped topping spreads smoothly over the chilled cake and stays light. Fresh whipped cream tastes great, but it softens faster and doesn’t hold up quite as long on top of a sheet cake.
- Fresh strawberries and blueberries — These are for garnish, but they matter. Fresh fruit keeps the top from looking flat and adds a clean bite against the sweet gelatin and frosting.
What Each Ingredient Is Actually Doing in This Recipe
- Primary ingredient (the star) — Quality matters most. Choose the best you can find.
- Cooking medium (oil, butter, or broth) — This carries flavors and prevents dryness.
- Seasonings (salt, pepper, spices, herbs) — Layer flavors so nothing overpowers. Build depth gradually.
- Aromatics (garlic, onion, herbs) — Cook with fat to bloom flavors. Become the foundation.
- Supporting ingredients — Complement the main ingredient without overpowering it.
- Sauce or liquid (if applicable) — Brings flavors together. Balance richness with acid.
- Acid (lemon, vinegar, wine, or other) — Brightens and prevents flat-tasting results.
- Final finish (garnish, glaze, or sauce) — Prevents one-dimensional taste and adds visual appeal.
Getting the Jell-O Into the Cake Without Overdoing It
Baking the Base
Bake the white cake in a 9×13 pan according to the package directions and let it cool for 15 minutes. You want it set enough to handle the holes, but not so cool that the gelatin just sits on top. If the cake is still very hot, it can get too soft and start tearing when you poke it.
Making the Holes Do the Work
Use the handle of a wooden spoon to poke holes all over the cake, about 1 inch apart. Press straight down and lift cleanly so the crumb doesn’t drag and close back up. Wider, evenly spaced holes give the Jell-O room to travel, which is what creates those vivid streaks inside the cake instead of a thin layer near the top.
Pouring the Red and Blue Layers
Dissolve the strawberry Jell-O in 1 cup boiling water, stir in 1/2 cup cold water, then pour it slowly over the left half of the cake. Do the same with the berry blue Jell-O for the right half. Pouring slowly matters here; if you rush it, the liquid runs across the top instead of settling into the holes, and the finished cake loses its striped look.
Chilling and Finishing the Top
Refrigerate the cake for at least 2 hours until the gelatin is fully set inside the crumb. The cake should feel cool and firm before you frost it. Spread the whipped topping evenly over the top, then finish with red and blue sprinkles and fresh berries right before serving so the decorations stay crisp and bright.
How to Change the Cake Without Losing the Look
Gluten-Free Version
Use a gluten-free white cake mix and follow the box directions closely, since those batters can be a little more delicate. The Jell-O layer still works the same way, but let the cake cool a few extra minutes before poking so it holds together better.
Dairy-Free Topping Swap
Use a dairy-free whipped topping in place of Cool Whip. The texture stays close, and it keeps the cake light on top without adding a heavy frosting layer.
Strawberry-Only Shortcut
If you want a simpler red-and-white version, use only the strawberry Jell-O and skip the blue layer. The cake will taste a little less festive, but the method stays the same and the slice still looks clean and cheerful.
Make-Ahead for a Crowd
Bake, soak, and chill the cake the day before, then add the whipped topping and fruit shortly before serving. That keeps the topping fresh and prevents the berries from weeping into the frosting.
Storage and Reheating
- Refrigerator: Store covered for up to 4 days. The cake stays moist, though the whipped topping softens a little after the first day.
- Freezer: I don’t recommend freezing this cake. The gelatin and whipped topping both change texture after thawing, and the cake can turn watery.
- Reheating: No reheating needed. Serve it cold straight from the fridge; warming this cake melts the topping and ruins the set Jell-O layers.
Questions I Get Asked About This Recipe
Red, White and Blue Poke Cake
Ingredients
Equipment
Method
- Bake the white cake in a 9x13 pan according to package directions. Cool for 15 minutes, until it’s warm rather than hot.
- Use the handle of a wooden spoon to poke holes all over the cake about 1 inch apart. Keep the holes evenly spaced so the Jell-O soaks through consistently.
- Dissolve the strawberry Jell-O in 1 cup boiling water, then stir in 1/2 cup cold water. Pour slowly over the left half of the cake so the liquid fills the holes.
- Dissolve the berry blue Jell-O in 1 cup boiling water, then stir in 1/2 cup cold water. Pour over the right half of the cake so red and blue stripes form side-by-side.
- Refrigerate the cake for at least 2 hours until the Jell-O is fully set inside the cake. Chill until the surface feels firm when gently pressed.
- Spread the whipped topping evenly over the top of the chilled cake. Make sure it covers the entire surface for a clean white layer.
- Decorate with red and blue star sprinkles and fresh strawberries and blueberries before serving. Slice to reveal the vivid red and blue Jell-O stripes soaked into the white cake.